﻿# Taxes

> Create tax components and plans for use with suppliers, customers, or products in Aragro.

Source: https://resources.aragro.com/en/taxes/
Language: en

Relative links and media resolve against the source URL.

> **Availability:** To use Tax plans, this feature must be enabled in your account and your role must have the corresponding permissions. If the option does not appear, [contact Aragro support](mailto:hola@aragro.com).

To add taxes to an expense or purchase order, follow these steps.

1. Go to **Tax components**, or open [the Tax components page in Aragro](https://app.aragro.com/finance/tax-components).
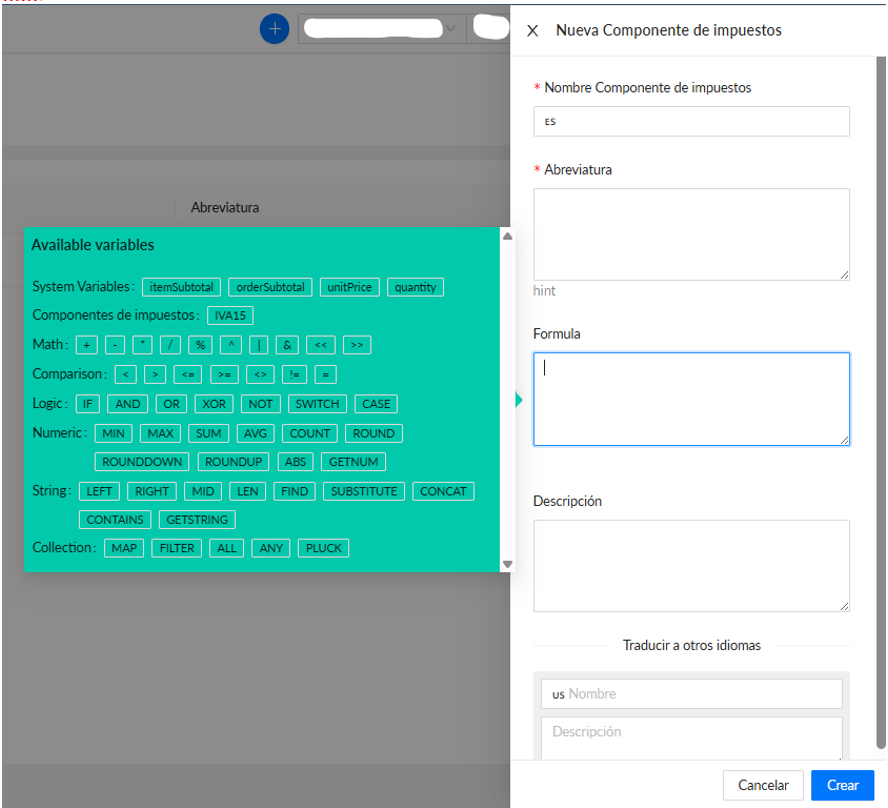
2. Click **“+ Create new,”** fill in the required fields (marked with *), and enter the desired formula in the **“Formula”** field to calculate your tax. This field uses the same logic as Excel formulas. When you are done, click **“Create.”**

<figure>
  <img src="/wp-content/uploads/sites/2/2025/03/image.png" alt="New tax component with the Formula field active and a panel of available variables, operators, and functions." width="888" height="808" loading="lazy" decoding="async" srcset="/wp-content/uploads/sites/2/2025/03/image-300x273.png 300w, /wp-content/uploads/sites/2/2025/03/image-768x699.png 768w, /wp-content/uploads/sites/2/2025/03/image.png 888w" />
</figure>

3. Next, go to **Tax plans**, or open [the Tax plans page in Aragro](https://app.aragro.com/finance/tax-plans).
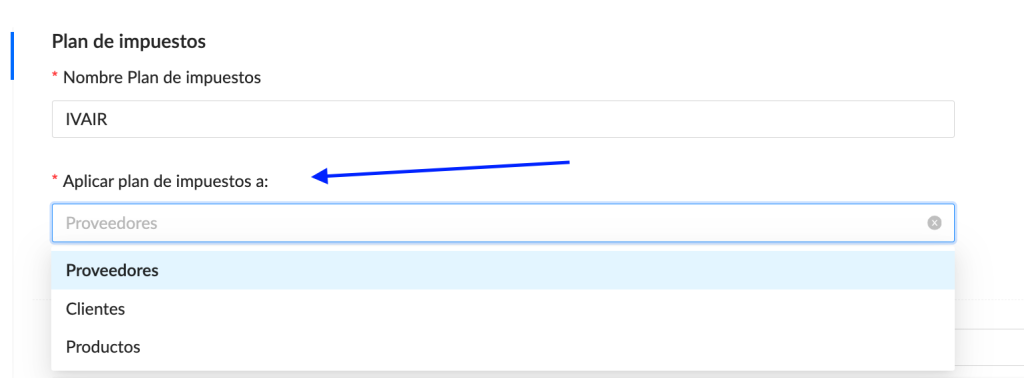
4. Click **“+ Create new”** and fill in the required fields (*). You can apply the tax plan to suppliers, customers, or products. Choose the option that fits your needs.

<figure>
  <img src="/wp-content/uploads/sites/2/2025/03/Screen-Shot-2025-08-12-at-09.58.28-1024x378.png" alt="Arrow pointing to Apply tax plan to; the menu offers Suppliers, Customers, and Products." width="1024" height="378" loading="lazy" decoding="async" srcset="/wp-content/uploads/sites/2/2025/03/Screen-Shot-2025-08-12-at-09.58.28-300x111.png 300w, /wp-content/uploads/sites/2/2025/03/Screen-Shot-2025-08-12-at-09.58.28-768x284.png 768w, /wp-content/uploads/sites/2/2025/03/Screen-Shot-2025-08-12-at-09.58.28-1024x378.png 1024w, /wp-content/uploads/sites/2/2025/03/Screen-Shot-2025-08-12-at-09.58.28-1536x567.png 1536w, /wp-content/uploads/sites/2/2025/03/Screen-Shot-2025-08-12-at-09.58.28.png 1538w" />
</figure>

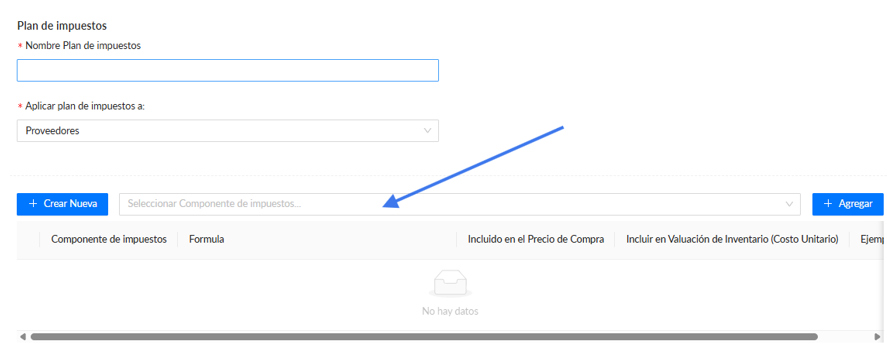
The dropdown will then show the tax component you created in step 2.

<figure>
  <img src="/wp-content/uploads/sites/2/2025/03/image-1.png" alt="Tax component selector marked between Create new and Add, below the plan details." width="887" height="347" loading="lazy" decoding="async" srcset="/wp-content/uploads/sites/2/2025/03/image-1-300x117.png 300w, /wp-content/uploads/sites/2/2025/03/image-1-768x300.png 768w, /wp-content/uploads/sites/2/2025/03/image-1.png 887w" />
</figure>

Your tax plan is ready. Next, follow the steps for the type of record to which you applied the plan.

## Suppliers

Follow these steps to add the tax plan to a supplier:

1. Go to **Counterparties**, or open [the Counterparties page in Aragro](https://app.aragro.com/counterparties).
2. Find and select the counterparty to which you want to apply the tax plan you just created. Click the pencil icon to edit that counterparty.

<figure>
  <img src="/wp-content/uploads/sites/2/2025/03/image-2.png" alt="Pencil icon to the right of Counterparty details for editing the record." width="554" height="64" loading="lazy" decoding="async" srcset="/wp-content/uploads/sites/2/2025/03/image-2-300x35.png 300w, /wp-content/uploads/sites/2/2025/03/image-2.png 554w" />
</figure>

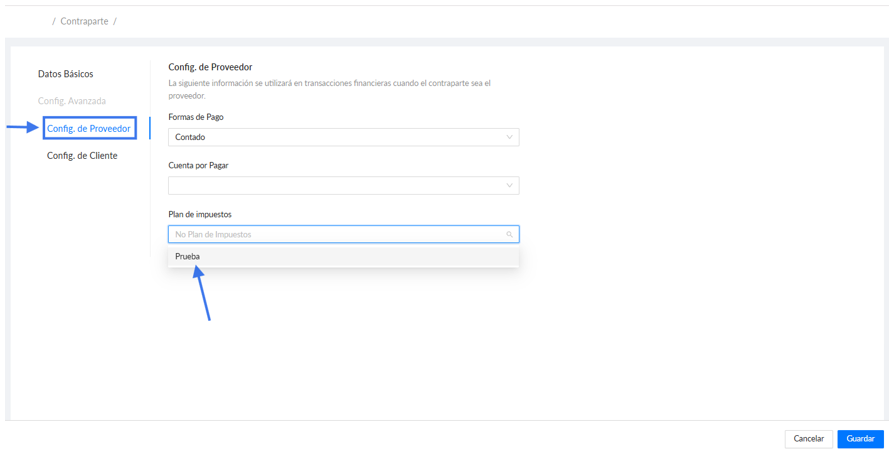
3. In **“Supplier config,”** find the tax plan you created earlier in the dropdown, as shown below.

<figure>
  <img src="/wp-content/uploads/sites/2/2025/03/image-3.png" alt="Supplier config highlighted and the Tax plan selector open to assign a plan to the counterparty." width="892" height="449" loading="lazy" decoding="async" srcset="/wp-content/uploads/sites/2/2025/03/image-3-300x151.png 300w, /wp-content/uploads/sites/2/2025/03/image-3-768x387.png 768w, /wp-content/uploads/sites/2/2025/03/image-3.png 892w" />
</figure>

4. Click **Save**.

## Products

Follow these steps to add the tax plan to a particular product:

1. Go to **Products**, or open [the Products page in Aragro](https://app.aragro.com/items).
2. Find and select the product to which you want to add the tax plan you just created. Click the pencil icon to edit the product.

<figure>
  <img src="/wp-content/uploads/sites/2/2025/03/image-4.png" alt="Pencil icon beside Product details for editing the selected product." width="553" height="61" loading="lazy" decoding="async" srcset="/wp-content/uploads/sites/2/2025/03/image-4-300x33.png 300w, /wp-content/uploads/sites/2/2025/03/image-4.png 553w" />
</figure>

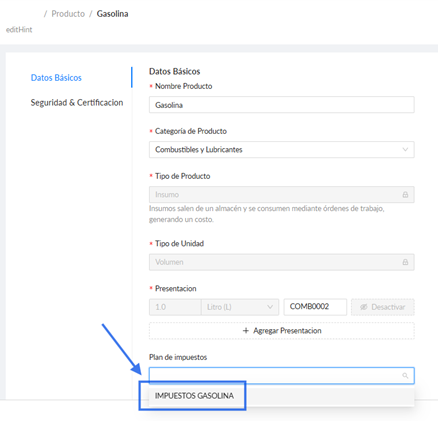
3. In the tax plan option, choose the plan you want to add to this product, then click **Save**.

<figure>
  <img src="/wp-content/uploads/sites/2/2025/03/image-5.png" alt="Tax plan selector at the bottom of the product's Basic data, with an available plan marked." width="438" height="421" loading="lazy" decoding="async" srcset="/wp-content/uploads/sites/2/2025/03/image-5-300x288.png 300w, /wp-content/uploads/sites/2/2025/03/image-5.png 438w" />
</figure>

When you buy or sell the product with the tax plan, Aragro will add this information. Here is an example:

<figure>
  <img src="/wp-content/uploads/sites/2/2025/03/image-6.png" alt="Purchase details with the VAT column highlighted beside the product subtotal." width="921" height="132" loading="lazy" decoding="async" srcset="/wp-content/uploads/sites/2/2025/03/image-6-300x43.png 300w, /wp-content/uploads/sites/2/2025/03/image-6-768x110.png 768w, /wp-content/uploads/sites/2/2025/03/image-6.png 921w" />
</figure>

<figure>
  <img src="/wp-content/uploads/sites/2/2025/03/image-7.png" alt="Sale details with the VAT column highlighted beside the product subtotal." width="921" height="130" loading="lazy" decoding="async" srcset="/wp-content/uploads/sites/2/2025/03/image-7-300x42.png 300w, /wp-content/uploads/sites/2/2025/03/image-7-768x108.png 768w, /wp-content/uploads/sites/2/2025/03/image-7.png 921w" />
  <figcaption><em>Note: The value appears as zero here for demonstration purposes.</em></figcaption>
</figure>

If you have a question that this guide does not answer, contact us in the Aragro chat and we will be happy to help.

See also: [Accounting setup: accounts, VAT, banks and journal entries](/en/accounting-setup/).